How to Clean Your Dog's Ears: Complete Ear Care Guide
Ear infections are the second most common reason that dogs go to the veterinarian [1]. Regular at-home ear care can help your canine friend, but what exactly should you do to keep your dog's ears clean and healthy? Read our step-by-step guide for everything you need to know about cleaning your dog's ears.
The importance of cleaning your dog's ears
While the human ear canal is horizontal, the dog ear-canal is L-shaped, with a long vertical section where fluid and debris can easily build up. This material can cause irritation, itchiness and ear infections in some dogs, but regularly cleaning your dog's ears can help to keep them clean.
Regular dog ear cleaning is also an opportunity for you to look at your dog's ears and spot redness, ear mites, and other ear problems early on, before they can cause your dog too much discomfort. Your dog will also get used to having their ears handled, making it easier to maintain their hygiene and administer any future ear care, e.g. ear drops.
How often should you clean dog's ears?
As a rule of thumb, monthly ear cleaning is sufficient for most dogs. Check your dog's ears before each cleaning; if they're a healthy pink colour with no odour, swelling, or build-up, they may need less frequent cleaning. But if you're noticing odours or excessive wax, or if your dog is scratching their ears a lot, you may need to clean your dog's ears more often (2-3 times a week), or as advised by your veterinarian.
Some dogs are more prone to ear problems and may need more frequent cleanings. These include:
- Dogs who spend a lot of time in water.
- Dogs with allergies.
- Dogs with a history of recurrent ear infections.
- Breeds with floppy ears, like Cocker Spaniels, Golden Retrievers, Old English Sheepdogs and Poodles.
- Hunting dogs.
In some cases, it might be advisable not to clean your dog's ears at all. For example, if your dog has certain ear conditions or has had a traumatic ear injury, ear cleaning may be harmful. If in doubt, always ask your vet for advice.
Step-by-step guide to cleaning dog ears
- Choose the right ear cleaning solution
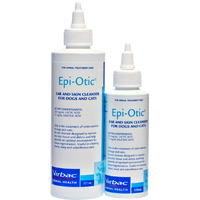
The first step is to choose a vet-approved ear cleaning solution for dogs. It may be tempting to use a home-made remedy, or something you already have in the medicine cabinet. However, these can be ineffective and even harmful for your dog. A veterinary-recommended dog ear cleaning solution, such as EpiOtic®, is a safer, more effective choice.
If you're unsure which ear cleaning solution is best for your dog, ask your vet for their recommendation.
- Gather your supplies
In addition to your dog ear cleaning solution, you'll also need cotton pads or a clean, dry towel. Never use cotton sticks (e.g. Q-Tips) to clean your dog's ears; they can push wax and debris further into the ear canal, irritate or injure the ears, or perforate the ear drum.
- Get comfortable
Choose a time when your dog is relaxed. Sit smaller dogs facing forward between your knees, so that you can gently hold them in place while easily reaching their ears. For larger dogs, you may need to sit them between yourself and the wall, with their rear in the corner.
If your dog is nervous during ear cleaning, try to calm them with praise, reassurance and affection before proceeding. If they continue to show distress (e.g. cowering, whimpering, running away), persisting can lead to anxiety or injury. Try again another time, or ask your vet for their advice or assistance cleaning your dog's ears.
- Insert the ear cleaning solution
When your dog is comfortable, gently lift up their ear flap to expose the ear canal. Squeeze the ear cleaning solution into the ear canal.
When the ear canal is completely filled with solution, massage the base of your dog's ear gently. This will help the solution to move around the entire ear canal, dislodging wax, debris and other build-up.
- Clean and repeat
Your dog will want to give their head a good shake to get rid of the ear cleaning solution, so you might want to grab the towel to protect yourself! When they're done, use the towel to dry off their head and face. Take a cotton pad and gently wipe any liquid and debris from the inner ear flap and ear canal, taking care not to go any further than an inch inside the ear. Then, repeat on the other ear.
Throughout the cleaning process, be sure to reward your dog for co-operative behaviour with lots of praise and treats.
When to consult a veterinarian
Visit your veterinarian if you notice a foreign body in the ear, parasites or signs of infection in your dog's ear(s). These might include:
- Redness or swelling
- An unpleasant smell
- Discharge or oozing
- Scabs or crusting
- Head shaking and tilting
- Balance problems
- Pawing or scratching at the ears
Don't try to clean your dog's ears if you think they could be infected, as this would likely be very uncomfortable for them and may make them anxious about future ear cleanings. Instead, ask your vet for advice on when to perform ear cleanings.
A simple solution for healthy, clean dog ears
With the right vet-approved ear cleaning solution, it's quick and easy to clean your dog's ears at home. By adding this simple step to your dog's grooming and hygiene routine, you can help keep their ears clean and healthy. Every dog is different, so be sure to ask your vet for advice if you have any questions about cleaning your dogs ears.
Click here for more information on EpiOtic®
EpiOtic® is a Restricted Veterinary Medicine. Available only under Veterinary Authorisation. Registered pursuant to the ACVM Act 1997, No. A006006
[1]. O'Neill. et al. Prevalence of commonly diagnosed disorders in UK dogs under primary veterinary care: results and applications. BMC Veterinary Research (2021) 17:69


.png)